
I recently finished the CRTO course (which is extremely great value) and it got me very interested in building red team infrastructure. This interest also comes from an incident where my very nice VPS provider sent me a very polite but firm email that running C2 infrastructure was not allowed on their infrastructure.
I’m not an expert in setting up C2 infra, and I’m sure others have way more sophisticated setups than mine, but this is how I’ve chosen to set up my infra.
BTW: this also includes how I decided to set up my connectivity to the on-prem infra which I thought was sufficiently interesting. If you are interested in how I set up the C2 portion only, then feel free to skip the first half to the Cloudflare portion.
Starting with on-prem
I wanted to own the hardware running the C2 as keeping a server running 24/7 adds up costs, especially if it is only for my own learning.
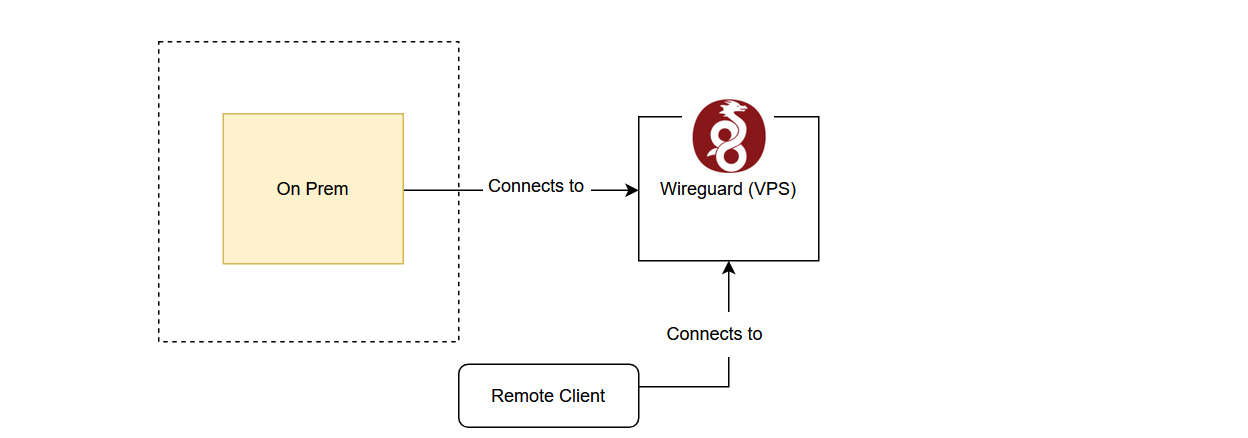
The first order of business is to secure access to my C2 infra. Assuming that I run it on an on-prem (read: Raspberry Pi) server, that means that I would need a VPN to access it if I wanted to access it from outside the network.
I’m could use Tailscale, but I wanted a more private solution. I decided to run an external WireGuard node on a VPS.
There were a few reasons why I wanted to run an external VPN server to access my infra:
- Minimal exposure of on-prem ports and IP. Running it on-prem would mean that I would need to expose a listening port on my on-prem hardware.
- I wanted to remotely administer my services.
- Technically not running C2 infra on VPS.
Exposing nothing but UDP
To keep this configuration as secure as possible, the VPS is only tasked with running WireGuard and a few other connectivity services that I will explain later.
With cloud-init and my cloud provider being able to spin up a VPS under 30 seconds, I also a few very interesting choices to manage my server (i.e. to add clients):
- I could manually SSH in to update the configuration
- or I could update the cloud-init config, tear down and spin up a new server whenever I need to make an edit
The reason why option 2 is appealing is that:
- Fixed configuration and not a fragile one that is tied to any particular server
- Server is patched to the latest version (just destroy, spin up a new one
apt update && apt upgrade)
No remote access is needed due to the above 2 points which is important because this node will be the one exposed to the public internet, so I wanted minimum exposure.
This also creates a few other benefits:
- A more secure VPN server. Now only the listening port is the UDP port required for initial WireGuard connections is required to be open. No SSH port, RDP, or VNC required.
- Cheaper. The VPN can be spun up as required and destroyed when not.
In a separate story, I also wrote a simple Telegram bot to turn on and off the server.
![[Pasted image 20260409212253.png]]
I immediately ran into problem 1
Constantly recreating servers means that the IP is not fixed. How will clients know which IP to connect to?
Fixed ip?
I initially tried buying a fixed IP, and it took a few networking shenanigans before I was able to allocate the fixed IP consistently to the VPS and route WireGuard traffic through it.
This can be configured by updating the iptables as following:
iptables -t nat -A POSTROUTING -o eth0 -j SNAT --to xxx.xxx.xxx.xxx
However, I realised this defeated the cost-efficiency purpose of an ephemeral server because I would have to pay to keep the fixed IP.
And so I discovered Dynamic DNS
Dynamic DNS works by having a domain (or subdomain) name resolve to an IP that you control. The idea is that the server would update the DNS entry when it receives its IPv4 IP address allocation. Clients would then query this DNS entry for the new IP address of the server to connect to. Duck DNS provides a free DDNS service.
It is simple enough, sign up using an account, you’re given a token that you can use to update the IP of a DNS address that you choose.
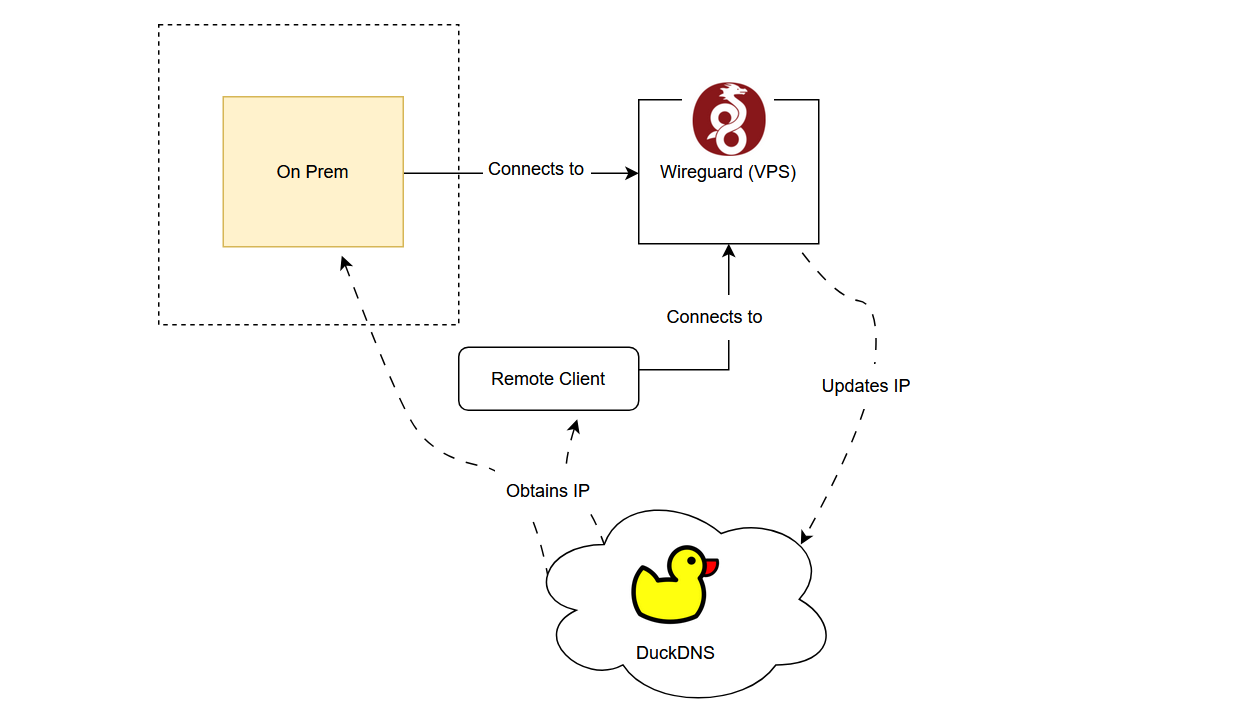
The theory is that I can add an update call into the cloud-init config of the WireGuard server when it is being spun up to update the DNS entry, which would allow clients to know the IP address of the new server.
Then it was time for problem 2
Long lived WireGuard clients only resolve their DNS once.
Honestly this wasn’t a problem when I only occasionally connected with my remote client. Each time I turned it on, it would resolve the DNS correctly.
The problem with DDNS is that WireGuard clients only resolve their DNS once upon connecting with a domain name. This is a problem if the server resets its IP after a long-lived client has connected. (i.e. the C2 server)
Luckily, WireGuard has already anticipated this use-case and provided a script: reresolve-dns.sh

This script resolves the DNS entry in the WireGuard configuration file. We just have to punch a hole in our routing table so that DNS entries resolve outside of the WireGuard tunnel (otherwise we’ll never be able to resolve DNS if the server is down), and set up a simple cron job to call the script every 10 minutes to update the DNS entry.
sudo ip route add 8.8.8.8 via [gateway IP] dev eth0
Make sure eth0 is the interface to your local gateway, it took me an embarrassingly long time to debug my own setup was not eth0, but ens.
To ensure that this will auto-resolve we can add a cron job at a reasonable interval.
sudo crontab -e

*/5 * * * * /bin/bash /usr/share/doc/wireguard-tools/examples/reresolve-dns/reresolve-dns.sh wg0 > /dev/null 2>&1
Now for the C2 infra
Assuming that I use HTTP/S for my C2 communications, simply forwarding requests from port 80 and 443 to my C2 server on the on-prem server will only result in the forwarding server being flagged, since it will appear to any observers that the responses originate from that server.
While the whole point of redirectors are to be a disposable resource, tasking the WireGuard server with being the redirector is a little close to home, and besides, I didn’t want to get another warning email from my service provider, or worse, a termination letter.
Cloudflare, would you tunnel this for me?
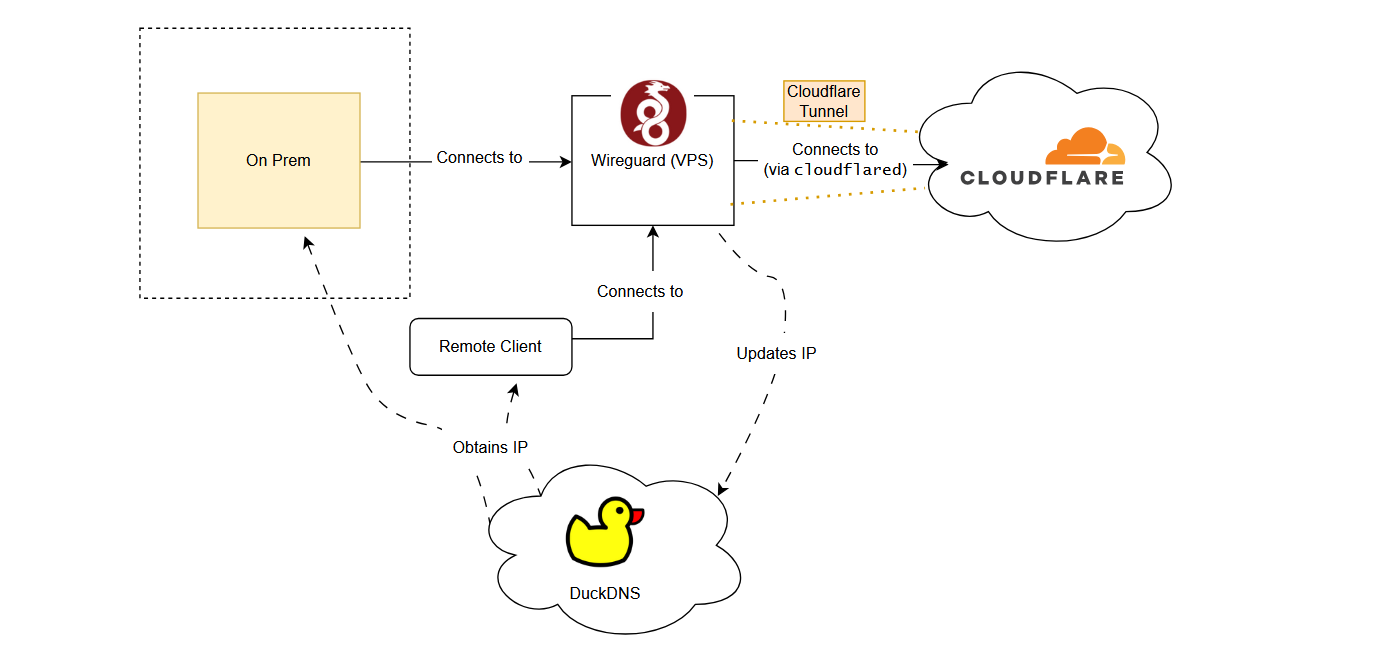
Cloudflare tunnels have been out for awhile now and are mainly used for their Zero Trust services. One interesting property I discovered is that Cloudflare tunnels have the capability to route on-prem resources to internal Cloudflare resources without exposing your resources to the internet, essentially creating a mini hybrid VPC of cloud and on-prem resources.


This creates the first hop. By running the cloudflared daemon on the WireGuard server, it creates an outgoing tunnel to Cloudflare, which again minimises the detection surface area of the C2 infra as we are not exposing any ports on our VPN hop.
But how can beacons connect to the WireGuard C2?
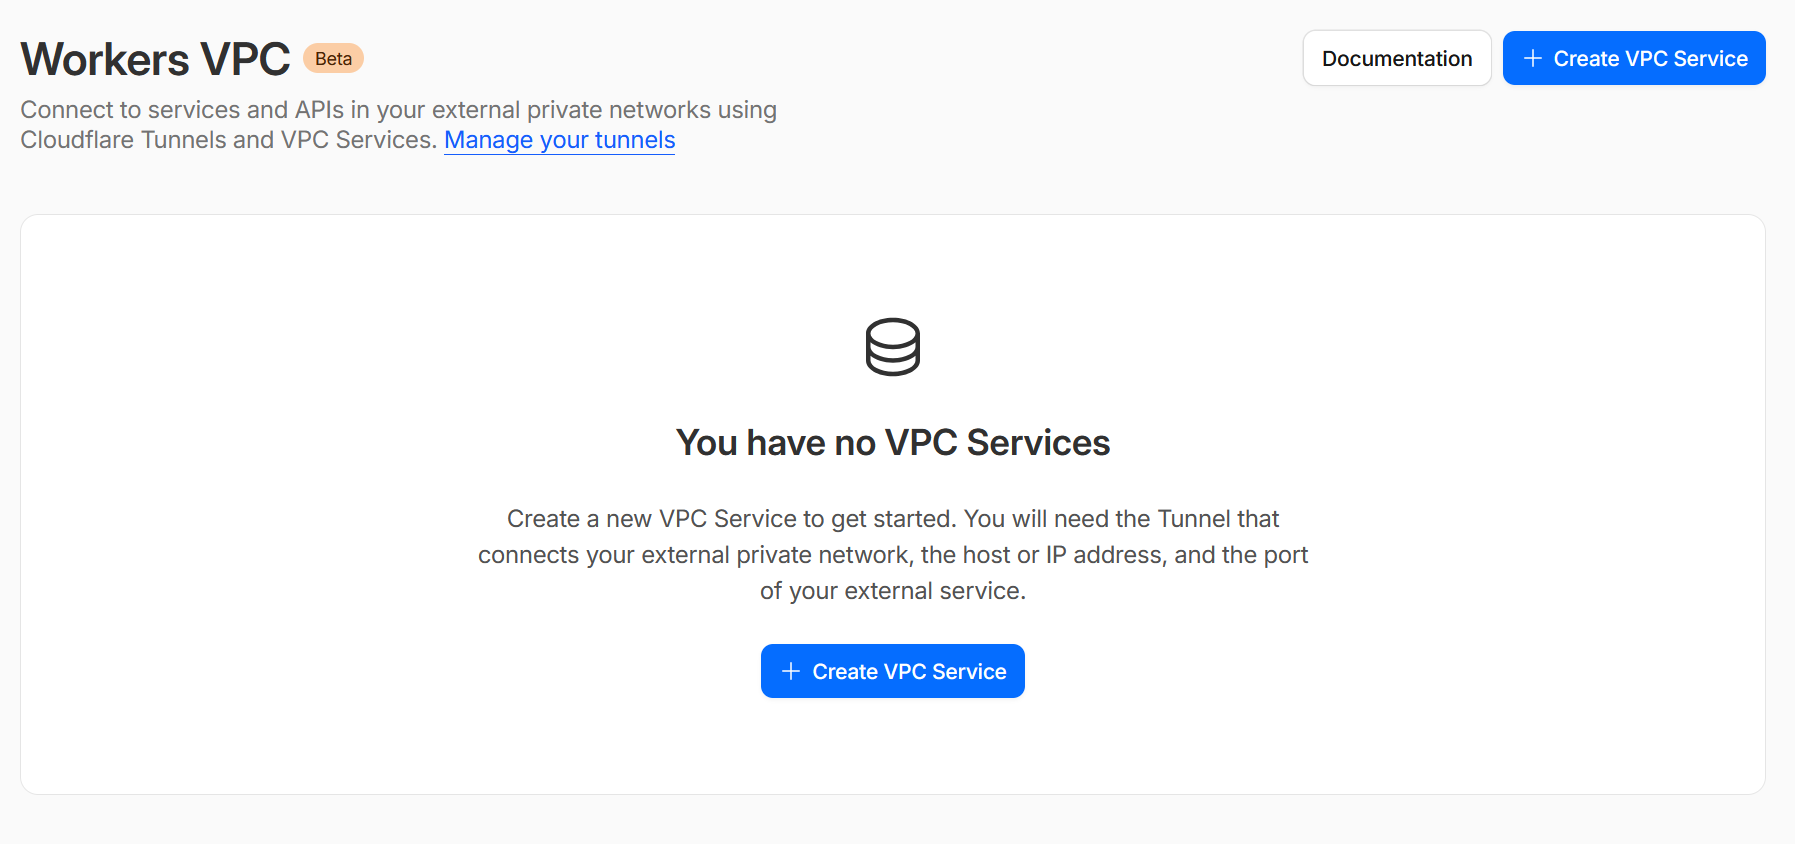
Cloudflare Worker VPC
I make no secret of loving Cloudflare Workers. Fast & serverless, they are great for quick computing tasks.
With the Cloudflare Worker VPC, I can also connect them to internal endpoints that are not accessible to the public internet.
And the tunnel is not accessible to the public internet because I have not connected any routes to it.
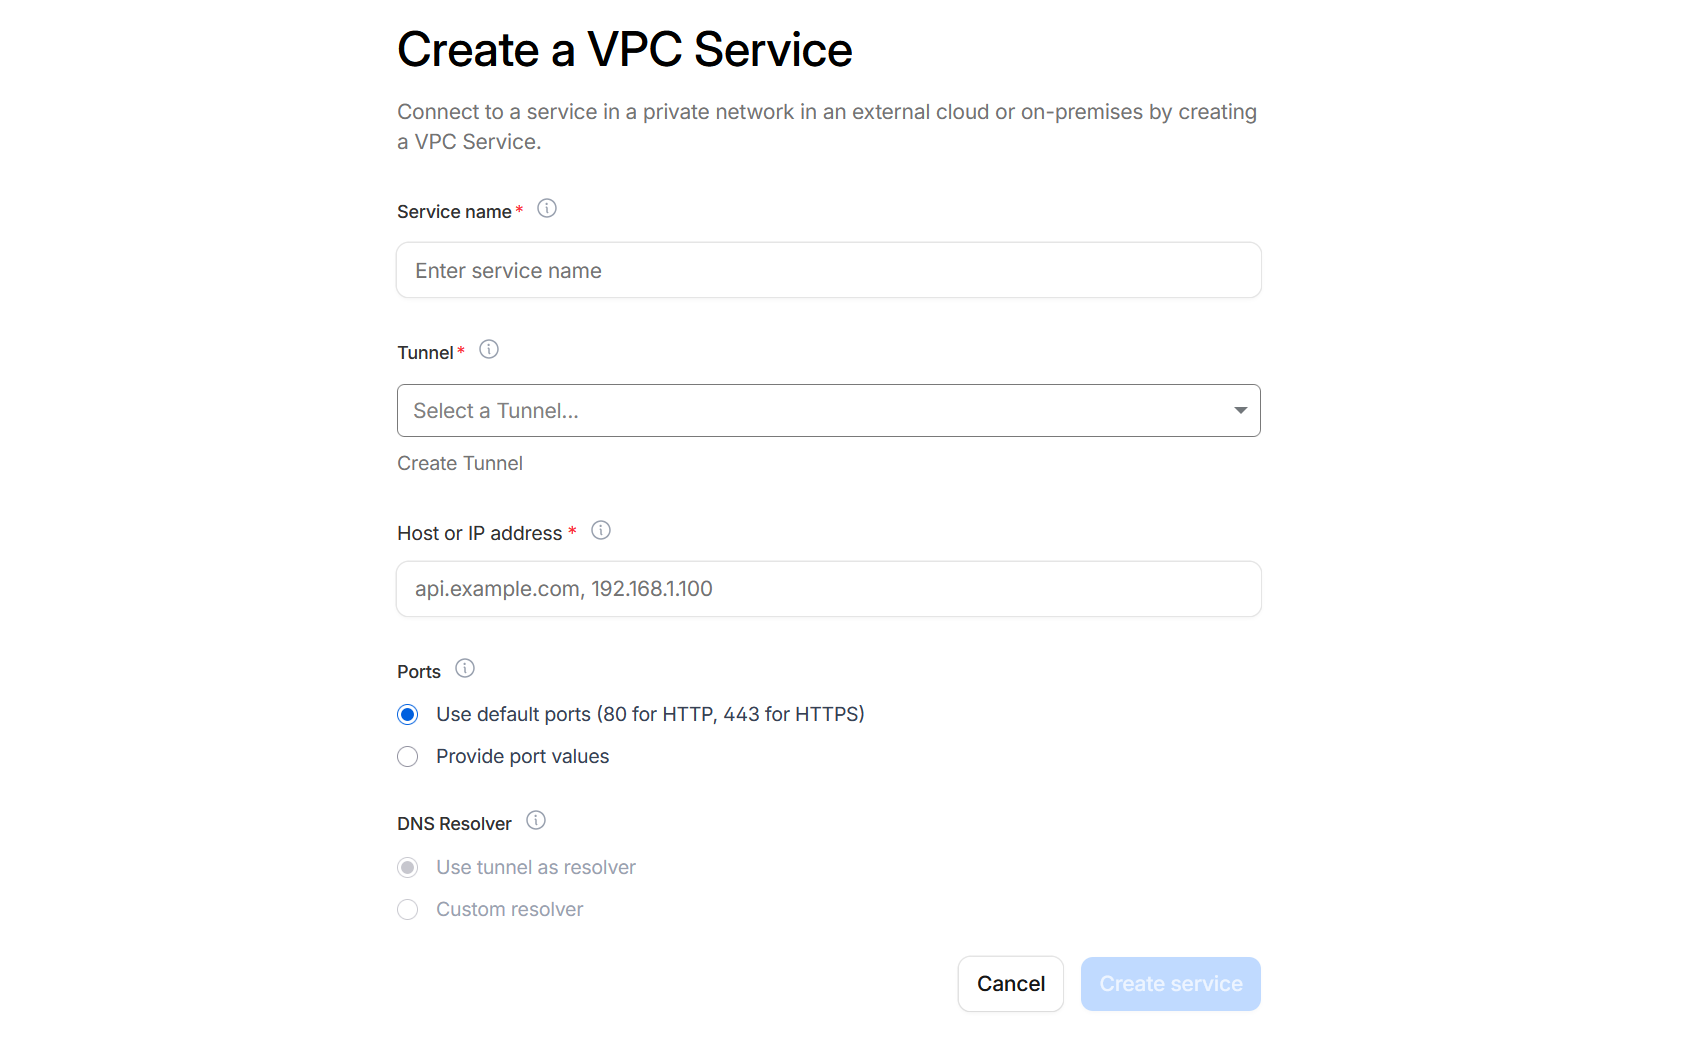
Setting up a Worker VPC is quite straightforward. Since I have already created a tunnel, I can create a VPC service that is linked to my tunnel.
Creating the service just needs a name and the tunnel I created earlier. The host or IP address is the internal IP address of the C2 server. Since Cloudflare Workers only serve HTTP or HTTPS, I left the ports as default.
With the VPC created, a service ID is generated which I can use to create a worker. I chose to deploy via wrangler locally.
{
    "$schema": "node_modules/wrangler/config-schema.json",
    "name": "my-worker",
    "main": "src/index.js",
    "compatibility_date": "2026-03-01",
    "observability": {
        "enabled": true,
    },
    "compatibility_flags": ["nodejs_compat"],
    "vpc_services": [
        {
            "binding": "REPEATER",
            "service_id": SERVICE_ID_HERE,
            "remote": true, // When true, utilizes [remote bindings](/workers/development-testing/#remote-bindings) to allow access to the VPC Service during local development.
        },
    ],
}
The index.js itself is also quite straightforward. It just forwards the request to the C2 through the VPC.
export default {
    async fetch(request, env) {
        const url = new URL(request.url);
        url.protocol = 'http:';
        const headers = new Headers(request.headers);
        headers.delete('Accept-Encoding');

        const modifiedRequest = new Request(url.toString(), {
            method: request.method,
            headers: headers,
            body: ['GET', 'HEAD'].includes(request.method) ? null : request.body,
            redirect: 'follow',
        });


        try {
            // env.REPEATER is your VPC binding name from wrangler.jsonc
            return await env.REPEATER.fetch(modifiedRequest);
        } catch (err) {
            return new Response(`Proxy error: ${err.message}`, { status: 502 });
        }
    },
};
After deploying the worker, the architecture looks like this:
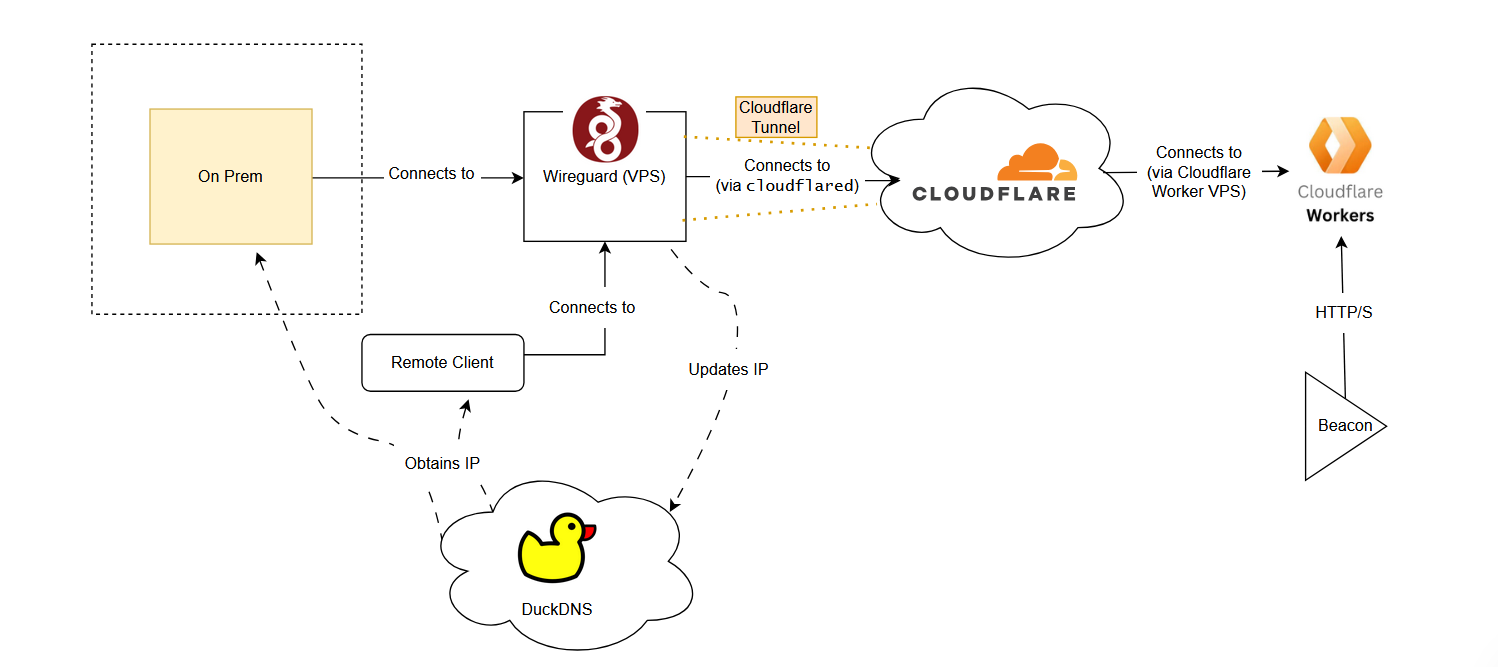 The benefit of this architecture is that I can leverage the good reputation of Cloudflare via Cloudflare Workers. I can also set up redirectors via workers and rotate them quickly across different campaigns if needed.
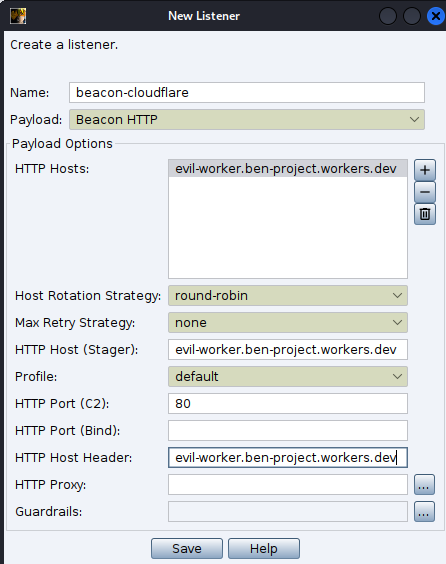
Now after setting up everything, the moment of truth!
 A view from the victim’s side. This resolves to a Cloudflare IP.
 And there it is, our little beacon.
Conclusion
I think this is a reasonably secure and simple base to work from. It also provides some flexibility in the Cloudflare layer to rotate between workers, but if the target is operating mainly using AWS or Azure, then spinning up a corresponding redirection layer in front of Cloudflare also works.